


Seriously, I am no super seamstress. In fact, when I did this a few weeks ago, it was my very first time using a serger.
I learned how to do this out of necessity. Why? We're going on a family trip to Disney World, so my sister and I got this grand idea that we'd dress the kids in matching shirts every day. Geeky, I know, but this way when one of us has all six boys (ages 7 and under) all to herself whilst everyone else is enjoying Splash Mountain, hopefully said person will be able to keep track of the boys if they all match. Makes sense, right?
The only problem is we're taking a pretty long trip, so we need a lot of shirts. 36, to be exact. I'm not about to shell out a fortune for 36 shirts, so I went the craft store route instead: $2 to $2.50 apiece for plain, colorful shirts. Of course, as they cost $2 to $2.50 apiece, they fit like crud. I am no fashionista, but I am not about to let my kids gallivant around Disney World looking weird because they are in extremely ill-fitting shirts.
Enter the need to learn this skill.
Let's get to it, shall we?
Lay your shirt out on your cutting mat (or floor, or whatever), inside out. Smooth it a bit, as you're going to be drawing on it.

To make the shirt the right size, you of course need to find a shirt that fits correctly. Use this shirt as your pattern piece. Turn the pattern shirt inside-out, and lay it on top of your other shirt. Line up their shoulders, and center the neck bands. Tuck the sleeves of your pattern shirt under so that you can draw that curve correctly. Smooth the pattern shirt.

Got everything all situated? Good. Now just take a marker and outline your pattern shirt onto the shirt you're resizing. It's not rocket science, so you don't need to be super picky about getting it just right.

There you have it: your pattern outlined onto your shirt.

Now take your handy dandy rotary cutter and cut along the lines you drew.
Next step: sleeves. Align the end of the sleeve on your pattern shirt to the end of the sleeve on the shirt you're resizing. Align the tops of the sleeves as well.

Then flip the shirt up and out of the way so you can outline your sleeve.


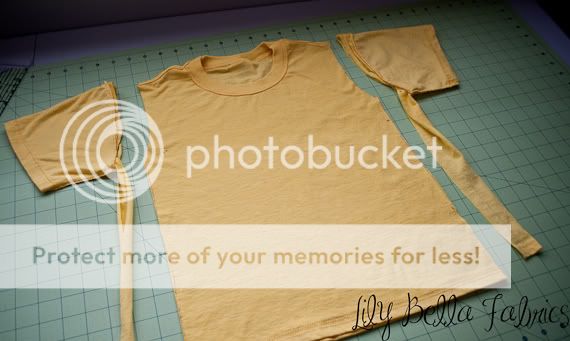
Once you have one sleeve pattern made, just lay the other sleeve underneath it, and cut them both out at once. Bada bing!

Take your shirt, still inside out, and serge from the armpit all the way down one side, and then the other. Then serge the bottom of each sleeve.

I must interject. Are you new to serging like me? You must lift the, um, mast thing that holds the thread. If you don't, your machine will jam. I'm just sayin'.

Here's the weird part. Turn your sleeve right side out. With your shirt still inside out, tuck the sleeve into the sleeve hole in the shirt body. You'll lay it out the way it is in the picture below, only you're going to have the sleeve inside the shirt, and you're going to line up the raw edges. Did that even make sense?

Starting at the seam in the armpit (which should be aligned with the seam in the sleeve), serge your sleeve and shirt together.

Ta-daaaaaaaaa! Turn your shirt right side out and admire your handiwork. Before moving on to your next sleeve, however, don't forget to turn your shirt inside out again. If you don't, you might, hypothetically speaking, sew your second sleeve onto the outside of the shirt. Hypothetically.

Voila! One resized t-shirt! You can of course shorten it if you need to, by cutting off the bottom, serging the raw edge, and hemming it up to the correct length, but that probably doesn't take a whole lot of explaining. Plus, I didn't need to do that, so I have no pictures for you.

If you happened to start with a blank t-shirt and want to have some fun, pick up some inkjet t-shirt transfer paper. With a little time in Photoshop, I was able to come up with this shirt for my 5-year-old's first day of school, wherein he will be showing off the fact that he thinks he's a gorilla:

If you have a light colored shirt and would rather not have the white background, you can get this kind of transfer paper instead. Then your shirt will come out looking more like this:

Either way, your shirt will look great, and much less "$2 shirt"-ey. Phew.


Great tutorial! Thank you.
ReplyDelete